Showing posts with label our house. Show all posts

Monday, 14 April 2014

Ombre stairs

IMG_1158
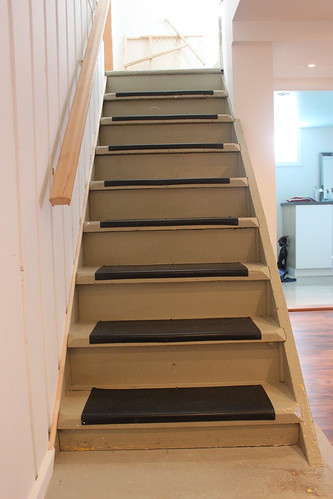
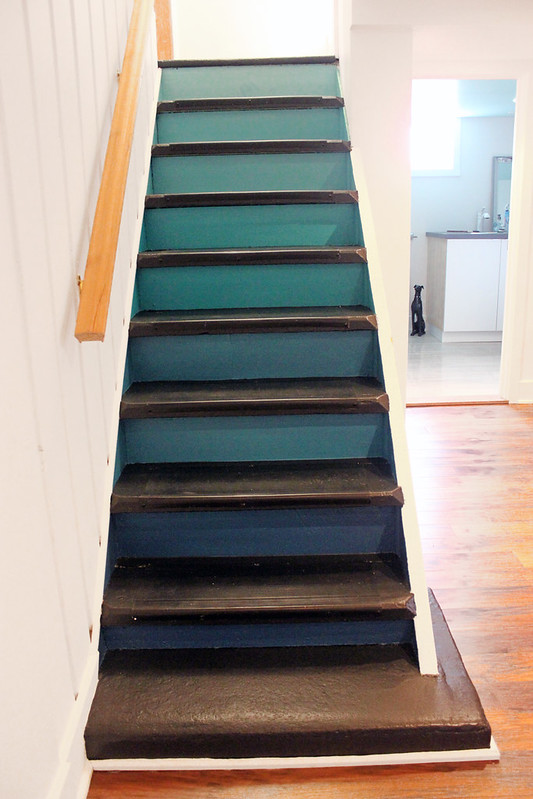
We undertook a major basement renovation last year. It was big, it was messy, it took forever, but now that it's done it has been amazing and I'm so glad that we did it and have added a whole other floor of living space to our home. The reno was completed a year ago, and yesterday I finally put the finishing touches on the stairs! They are the original stairs and are solid functional, perfectly fine stairs, but they were painted this shade of mossy green that I just really can't stand. So I figured it was about time that I make use of my colour mixing skills to mix up a few blue/green shades and paint the risers in an ombre effect! 

Of course, I'm no master basement/low-light photographer, so trust me that in real life the gradient is more pronounced than it looks in this photo. 

Below is the before shot:
IMG_0361
(I've purposefully made it smaller because I don't want a massive image of my ugly old stairs mucking up my pretty blog)

I'm very pleased to have officially ridded my house of that particular shade of puce. The awesome thing is this project cost only a few dollars to complete as I already had the black paint, the white paint, 2 shades of turquoise (the darkest and the lightest) and just bought a medium green/blue shade to mix with my light and dark to create a 5 colour gradient. It was fun. 
IMG_0373
I'm trying to take a more casual approach to my home decorating these days. We've done some major projects that needed to be taken seriously and done right, but now it's all about putting our personal stamp on things and I'm having fun just playing. Next up on the list now that the weather is improving is finally tackling the office! 

Wednesday, 3 April 2013

Baby's Room!

copyIMG_4337
The baby's room is ready! We've been working on it on and off for a while now and have just recently put the final touches on our baby's space. I know that lots of people do not think of the nursery as a priority. The baby won't know the difference whether he/she's in a beautifully decorated space or a cardboard box. That rational makes a lot of sense, but not for me! I'll know the difference. I expect to spend a lot of time in this room in the coming months, and I'd like it to be a space that I can enjoy. I've loved every step of planning this room and when I walk into this space now, I love it! It makes me so happy. Having a lovely and organized space will definitely help me relax during late night feedings! Chaos and clutter stress me out, I need a calm and soothing space for me and my baby. 

First, here are the before shots! By the time I got around to taking these shots we had already switched out a hideous ceiling fan for this pretty birch orb, had painted the walls a soft cream and the ceiling aqua blue. We had the crib and had moved an old storage cubby unit from the basement to the nursery (this unit was left over from when I used to use it as part of my TFA show booth display.) I picked up the dresser and the chair (it rocks and swivels!) at a second hand store for peanuts. So, this is what I was working with:
nurseryBefore
The room is quite small, it's perfect for a nursery, but is definitely not a large space. We had the chair reupholstered in a blue/grey tweedy fabric. I love how it turned out! We purposefully picked a fabric that would work well anywhere, if I eventually move this chair to the living room, it'll look great. We spruced up the shelves by putting on a backboard and painting it the same blue as the ceiling, we finished off the raw edges with iron-on melamine tape and raised it off the floor by attaching 4 teak wooden legs. The legs match the chair legs and the finish on the dresser. 
copyIMG_4287
There is lots of room to grow in this space. All those storage boxes on the bottom shelf of the cubby are empty! The closet has 4 shelves and a hanging rod that are mostly empty and the dresser has a bunch of teeny tiny onesies in the top drawer and not much else! 
copyIMG_4345
nurseryArt
We've got art and books! The Noah's Arc needlepoint was made for me by my mother when I was a baby. I remember it hanging on the wall above my bed my entire childhood. Mom passed it down to me for Christmas this year and it's so special. We put baby pictures of me and Chris on the dresser (funnily enough, both adorable baby shots are of us sitting in rocking chairs! Random, but awesome.) so we can play that fun game "who does baby look like?" We've got photos of baby animals and a beautiful baby fox painting made for us by my very talented friend Sara. 
nurseryCrib
Of course there is my bird mobile and the crib bedding I've hinted at several times! I picked out the multicoloured, polka-dot chevron fabric first and then chose a few other coordinating fabrics to go with it. I love how the bedding came out. Mom and I spent a day making it, it was a lot of work and a lot of math! But it's perfect. 
copyIMG_4325
Now that the room is ready, all that's left to do is sit around and wait for baby to join us! Any day now...

Friday, 8 June 2012

Hardly working

The studio

This was me on Wednesday afternoon, working on a new pattern. This is how I know we made the right decision when we chose to stay small and build our own little studio in the back yarn instead of going big and renting a space. Chris was dyeing in the studio, I was keeping him company and working on a swatch. Life is good. 

My new desk chair

This is how I plan on spending my weekend, minus the part where Chris is working... and maybe instead of enjoying my little patio I'll take my knitting to the park for World Wide Knit in Public day!

Wednesday, 16 May 2012

pretty purple posies

I was about to begin this blog post with the statement: "I love flowers" but that seems silly, of course I love flowers, who doesn't!? I've never considered myself much of a green thumb, I always start off the summer gardening season with lots of enthusiasm but then it fades and by August I have an overgrown mess of a garden. This year will be different! I'm totally committed to keeping up with my flowers. I'll report back in August and let you know how it's going. :)

pretty purple pansies
Pretty purple pansies in a turquoise urn outside the studio. Love those happy pansy faces.

flox in my garden
flox in my garden

Last year Chris and I moved the rock wall that lines the raised portion of our front garden out about 2 feet so we would have more room for plants in front of the shrubs that run the front of our house. We transplanted a few hardy specimens (hosta and stonecrop are always reliable) and then planted a row of flox on the edge of the rock wall. Last year they were pretty, but still small. This year they are bursting! Cascading over the rock wall and looking so lush and lovely. I think that it's the fact flox bloom early in the season that make them one of my favourite flowers. Early blooms are always so exciting! 

Friday, 2 March 2012

Our warm and cozy fireplace

Last Friday I mentioned that we were having a gas fireplace installed in our living room. The installers did their work like the pro's that they are. The left Friday afternoon and we had a fully functioning gas fireplace... but that was it, just a big black unit, propped up on a couple of visible shims, protruding from a hole in the wall. It was not pretty. Chris and I spent the next 5 days working on prettying it up! I am very proud of us and all that we were able to figure out on our own. We did everything from the designing, the framing to the tiling and the finishing. We even built those doors, with arched detail and all! I didn't know we were capable of all this, but now that I do, there is no limit to the amount of household improvements I want to tackle on our own!

Here are a few sneak peeks at the details of our new fireplace and built ins. 

Fireplace built-ins

The fireplace surround is tiled in a beautiful light glass mosaic. It's reminiscent of marble but is extra glossy and sparkly and has a bit more of a modern feel. To the left of the fireplace we built a shelving unit with one open shelf on the top and closed storage behind the doors on the bottom. 

Fireplace built-ins

To the right of the unit we have two open shelves that continue all the way to the wall. The unit is asymmetrical, but still balanced. We combined sparkly glass, mid-toned woods and bright white to hopefully create an overall look that is modern and streamlined but still classic and warm. My mission this weekend is to hang art above the mantle and put all the storage space to good use! Oh, and also to spend lots of time relaxing in front of the fire. :)

Friday, 24 February 2012

A few new pretty things from my favorite sites

My new heart bowls

I think that one of the reasons we all love Etsy so much is because we know that by purchasing a beautiful handmade item directly from the maker's Etsy shop, we are supporting the artist directly. I love knowing that the person who made these beautiful little heart shaped bowls wrapped them up with care herself and shipped them to me. Gosh I love handmade things! 

Aren't these little bowls just the sweetest? I'm not sure what I'll use them for, earrings? Condiments? I think that the little one would be perfect for olive pits. is that weird? When I'm entertaining I often put a dish of delicious olives out as part of my appetizers, but then you're always left with the awkward situation of having to spit your pits out into something... a little heart shaped bowl would be just the thing. 

These beautiful heart nesting bowls were purchased from JD Wolfe Pottery. I love the colour!

My new heart bowls

I have another favorite site to thank for this next purchase. I pinned this image on Pinterest months ago and kept going back to it. I just love this pencil drawing. It's light and fine and that bun is just so familiar looking to me. As a perpetual bun wearer I finally caved and purchased this 5x7 print from Belafonte on Etsy. The print is called "A Perfect Mess". Isn't that nice?

gorgeous print

Since taking this picture I have framed this print in a simple, light birch frame. I'm planning on hanging it as part of a collection on top of my new fireplace. That's right, new fireplace! Chris and I are adding a gas fireplace to our living room and it is being installed today! Full details coming soon, I cannot wait! 

love this cat!

Next, this hilarious little blue cat. Ok, the cat itself isn't blue, but to me the overall feeling of this print is blue and I love that. The cat reminds me of my family pet Tristan, and he's wearing a bow tie, best $15 I ever spent! He is admittedly very silly, but he brings me so much joy. :) This print is called "Handsome Cat" by Alice X. Zhang and was purchased here. I was so enamored with him when he arrived in the mail that without removing him from his celaphane wrapper I immediately taped him to the wall. I've since moved him and taped him to the side of a cabinet. I'm keeping my eyes open for an 8x8" frame, but until I find the right one I'm happy to move him around the house and tape him up where ever feels appropriate.

Last up, an original work of art that I threw together in one afternoon (including drying time) all in I don't think it took more than 20 minutes of actual work. Inspired by this image that I pinned months ago I decided to attempt my own version. I had started collecting crocheted doilies a while ago, but my collection never amounted to more than a couple discoloured, sad little doilies. I grabbed an old canvas, some gesso, leftover paint and voila! Instant doily art. I really like it, it's subtle, textural and fiber-licious. 
doily!

Monday, 21 November 2011

Progress

Cobalt Julissa

My Cobalt Julissa is coming along nicely. I honestly did think that there was a possibility that I would be able to finish this sweater in one weekend, but alas, no such luck. I cast on enthusiastically, and I worked on it exclusively all weekend. It's not finished yet, but I'm well on my way. I've tried it on and it fits exactly like it should. So far, so good!

The studio reno is moving along nicely. Most of last week was spent working on invisible parts of the project, things like burying pipes underground. Then they poured the foundation, the most beautiful, smooth, shiny slab of concrete I've ever seen. Chris filled in the trench and put the grass back, that was one of the reasons that we opted to dig the trench by hand, Chris carefully removed the top layer of soil and grass and put it aside, when the work was done and the trench was back filled he then replaced all the grass and now we have our yard back! Friday the magic happened, I looked out my window in the afternoon and there was a building in my yard!

studio, week 1 progress

This part is really exciting. See that big 9 foot wide window opening on the side? That's going to be so nice to work under. French doors, a vaulted ceiling, the studio is going to be the nicest room in our house!

Sunday, 13 November 2011

How I spent my weekend

I spent my weekend digging up my backyard! 

Just diggin'

Do I look like I'm having fun? I tried to keep a positive attitude and cheer on the boys (Chris and my dad did the majority of the work) but trust me, digging a trench, 4 feet deep and 40 feet long is no fun at all! Luckily the weather cooperated, and considering we're doing this project mid-November we are extremely lucky.

So, now the big question, why are we digging up our yard? Up until now we've been dyeing the yarn in the laundry room in our basement. Our basement is only semi-finished, so it's worked out really well so far. However, over the past couple of months it's become clear that the laundry room/dye studio is not going to cut it for much longer. We looked into every single possibility, renovating the basement to accommodate us, renting a space to work from, and in the end we decided that we love working from home and aren't ready to give that up yet, plus the added expense of renting a space and all the extra costs associated with it made me nervous. So though we wanted to continue working from home we also wanted to reclaim our basement for ourselves (we have big plans to make the basement into a rec-room one day.) 

What we've decided to do is tear down the little old shed that lived in the corner of our back yard and build a dye studio in it's place. The shed was very old and rickety, I did my best to cutesy it up (this photo was taken before the door was painted turquoise) but the truth is it wasn't very useful. We have a garage where we are able to store the lawnmower and gardening tools that this little shed used to house. I don't think we'll miss it much. 

Our cute little old shed

So, Chris tore down the shed and we spent the weekend preparing the yard for the work that will begin today! It shouldn't be that big of a project, we're working with the same great contractor who helped renovate our bathroom earlier this year. The most complicated part is running water and electricity from the house out to the new studio, hence the 4 foot trench. 

Chris - brute strength

To put that into perspective for you, I'm just over 5 feet tall, 4 feet is deep!

The team

Friday, 19 August 2011

Bathroom reveal

When Chris and I bought our first home in May of 2010, we got very lucky and ended up with a beautiful little gem of a house that really didn't need much work. There was one exception, the one main bathroom, it needed a complete overhaul. It was very small, it was awkward and though it was clean, it always looked a bit grungy (see for yourself in these before shots.) We spent the first two weeks of May working like crazy with our wonderful contractor Greg. When Greg left after two weeks, our new bathroom was almost done, all we needed was a mirror and a few accessories... three months later, and a mirror finally went up. Our bathroom reno is done! 

Finished bathroom - overall view

The bathroom is by no means huge, but by knocking down a wall and borrowing two extra feet from the second bedroom we were able to install a large, built-in vanity with tons of storage space and a beautiful wall to wall countertop. We placed the square sink off center, this made the most sense for us because it allowed us to fit in all those wide drawers, and it makes it a lot easier for more than one person to be in the space at once. Chris could brush his teeth in front of the sink, while still allowing me access to the drawers to get at my all my products. 

A few of the many details:

* Instead of dry-walling the ceiling we chose to install pine that we then painted white, I think it adds character to an otherwise pretty crisp space. Plus, our kitchen and office have bead-board ceilings so it ties in with the rest of the house nicely. 
* The floor is black slate installed in a herringbone pattern, and it's heated! Love it. 
* We used an exaggerated white subway tile (4x16) in the shower, accented with a hint of carrera marble in the form of two 4" high stripes made up by stacking 1x1 tiles on either side of a 2x4 tile. I love carrera marble, but we certainly did not have the budget to build a marble bathroom, I'm happy to have purchased the tiles at a discount tile warehouse, and have used them sparingly. It makes the hits of marble feel very special to me. 
* The countertops are Silestone, we chose this material because its beautiful, its a bit sparkly as its made from recycled glass and stone, and I'm told its practically indestructible! (ours is called White Diamond and is from the eco series.)
* The walls are painted the prettiest shade of lavender/grey, depending on the light they sometimes look like a cool mauve, or a soft grey. The colour is called Frost by Martha Stewart. 
* The paintings that I did for the bathroom add a lot of colour to an otherwise very white and grey space. The one on the right also serves as the door to our recessed medicine cabinet!

Glamorous toilet and tub.

The tub and toilet are lovely. The toilet is a dual flush and works like a charm (which is a huge upgrade from our old toilet, it never flushed properly, very annoying!) and the tub is deep, angular, modern and awesome, no weird swirls on the side, just sleek and cool. 

Finished bathroom, I love it!

I tiled the backsplash and built that little shelf myself! 

As far as reno's go, I think that this was fairly painless. It was over quickly, it came in right on budget, it turned out exactly how I had planned, and we're very happy with it. It was messy, and though Chris would probably tell you that I had a few meltdowns, I'd say that I played it pretty cool. I really loved the whole design process. I can't wait to do the kitchen next! (Eventually...)
Friday, 6 May 2011

Bathroom Reno - Before & During

Bathroom demo!

Before Chris and I loaded up the van and headed off to Toronto for the weekend for the DKC Knitter's Frolic, Chris had one last major job to do... he had to completely demolish our main bathroom so our contractor could start renovating on Monday. So, Chris took Thursday to work on the bathroom, we were gone Friday to Sunday evening, Sunday when we got home Chris and my dad spent a few hours tearing down what was left of the walls, and then Monday morning the contractor started working towards putting the place back together. 

I helped demo too!

Demo sounds like fun right? Picture a man, a sledge hammer, welcomed destruction. Turns out, not so much. It was really hard work. I pitched in for about 2 minutes and made sure that mom was there to snap a picture of me in action (that's one of the perks of renovating a small space, there's only room for one person to work in there at a time!) Hat's off to Chris for being such a trooper.   

Here is a before picture of the bathroom. Small, beige, weird vanity, lots of medicine cabinets, strange brown flower tiles, grungy floor, a baseboard heater that doesn't work... lovely.

Bathroom before - Vanity view

And here is the tub view from the door. Very shallow chipped beige tub (I never took a single bath in that tub). Since we had no storage in the vanity we put a temporary little shelf in the bathroom that ended up being a junk collector for my hair elastics and toiletry products.

Bathroom before - Tub view from the door

Chris and I like to consider ourselves pretty enthusiastic DIYers. We paint, change the occasional light fixture, make curtains, do minor woodworking. We originally thought that this bathroom reno would be a very hands on project, but in the end we found a great contractor who is willing to let us help when we can (like demo) but is taking care of all the hard stuff himself; electrical, plumbing, ventilation, heating, moving a wall... all stuff that is way out of our comfort zone. Seeing as how this bathroom is our family bath and guest bath, it needs to be done right. 

The first week of renovating is almost done and things are finally starting to look like they're actually going to come together. The wall has been moved, plumbing and electrical have been sorted out, the tub went in yesterday, drywall should be going up today... exciting!